Showing posts with label Dotted Scallop Ribbon Border Punch. Show all posts

Wednesday, November 30, 2011

Ed's Birthday Card


I made this card a long time ago, when this stamp set first came out in the Holiday mini catalog last year. I made the background paper with post it notes and a brayer and then stamped and embossed the medallion on top of it and also stamped the swirls from Baroque Motifs on the bottom piece. If you look real closely you can see the smallest pearl right in the middle. The Wild Wasabi is embossed with the lines ef. The card got a lot of admiring on Sunday when I gave it to Ed my brother in law for his birthday.


Here is the inside of the card, I always like to put some kind of lighter card stock inside when I'm using a dark color for the base of the card. It makes it so much easier for the recipient to read the message and sort of ties everything together.
Let me know if you have any questions and thanks for stopping by At Paula's Place.

Supplies:
Stamps: Day of Gratitude, Baroque Motifs, Happiset Birthday Wishes
Paper: Basic Black, Whisper White, Pumpkin Pie, Wild Wasabi
Ink: Pumpkin Pie, Wild Wasabi, Daffodil Delight, Black Craft, Basic Black
Tools: Eleganat Lines ef, Dotted Scallop Ribbon Border punch, Scallop Trim border punch, basic pearls, black 1/4" grosgrain ribbon, clear embossing powder


Remember today is the last day of the Big Sale, head over to the stampin' Up website and check out all the deep discounts and then call me with your order. Because I'm giving you free shipping on any order over $50 you have to go directly through me to get that. 301-471-7366
Posted by Picasa

Wednesday, October 26, 2011

Challenge Stamping 411 #226


Okay, it's getting serious now. It's the end of October and I have to get going on my Christmas Cards. What are you doing this year? I would love to hear from each of you about your ideas for Christmas cards. What stamp sets are you using, dsp? Things like that.
This card went together very fast. I used the blossom petals builders punch for the petals of the flower and the leaves. I punched a scrap piece of card stock with the 1 1/4" circle punch to glue all the petals to and after the flower was constructed I sprayed it with smooch spray. The center is a 3/4" circle of brushed golf cs with the basic pearls put on it. The dsp is from last year Jolly Holiday dsp I think is what it was called. I also used the Dotted scallop ribbon border punch on old olive cs for my ribbon element. I love that punch, turns any card stock into a ribbon and it's flat for mailing.
A pack of dsp really goes a long way. I had a class using this paper and made several cards and still have six sheets that aren't even cut yet. The sentiment is from Petite Pairs. The colors are Cherry Cobbler and Old Olive with Very Vanilla
If you have any questions let me know and thanks for stopping by At Paula's Place
Please leave a comment and let me know you visited me. Bye for now.
Posted by Picasa

Thursday, September 1, 2011

Another Christmas Card design


Several weeks ago I started making Christmas Cards, I am going to post them as I complete them so here's another one that I came up with. I love the dry embossed poinsettias in the background with the stark contrast of the cherry flower against the white. It seems to pop off the card. This is a very easy card to make, the hardest part is waiting for the smooch spray to dry on the flower so the rest of the card can be assembled.
  • The base of the card is cherry cobbler 5 1/2 x 8 1/2 folded in half.
  • Then I took a piece of white card stock 4 x 3 1/4" and ran it through the Big Shot with the petals a plenty ef.
  • The flower is made by using the 5 petal flower punch. I used the paper snips to cut into the center a little bit more between each of the petals and then did an embossing line right down the middle of each petal and leaf. I then folded each petal and gave it a good pinch. I used stickles in gold for the 3 dots in the center then sprayed them with smooch spray and let them dry overnight. 
  • The old olive piece 4 x 2" is stamped with the sentiment in cherry cobler  ink.
  • The dsp is Jolly Holiday (retired). 1 1/8" piece on top and a 1" piece on the bottom both punched with the scallop trim border punch.
  • Then a strip of cherry cobbler cs punched with the dotted ribbon border punch and adhered to the seam.
Supplies:
Stamps: Heard From the Heart
Paper: Old Olive, Cherry Cobbler, Whisper White,  Jolly Holiday dsp (retired)
Ink: Cherry Cobbler
Tools:  5 Petal Flower Punch, Petals a Plenty embossing folder, Scallop Trim Border punch, Dotted Scallop Ribbon Border punch, Big Shot, Stylus, Smooch Spray


Thanks for stopping by At Paula's Place.

Posted by Picasa

Tuesday, August 23, 2011

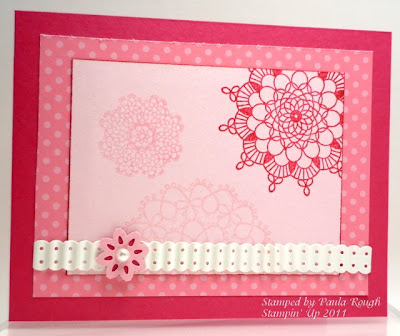
411 Challenge 217 Pink Doilies

Sometimes you just have to flip that sketch. I stamped that big Melon Mambo doily up in the corner then realized that it needed to be opposite my punched image so I just flipped it from the right side to the left. I like it. Do you know what the punched image is? I know it's a cute little flower but are you looking at your punches wondering if you own it? I'll  tell you what it is in a minute.
There are two challenges over at Stamping 411 this week. This is the first. Here are the dimensions.
Base: 1 1 x 4 1/4", scored and folded in half at 5 1/2"
Layer 2: 4 7/8" x 3 5/8"
Layer 3: 3x4"
Layer 4: Ribbon or cardstock
Layer 5: ANY shape punch

This is what I did. I scored and folded a piece of Melon Mambo cs 11 x 4 1/4 for the base. Added a piece of dsp from the brights dsp stack in Regal Rose, then a piece of Pink Pirouette was stamped with doilies, the large one in Melon Mambo. the small in Pretty in Pink  and the other large one in Pink Pirouette. Then I used the Melon Mambo marker to outline the edge of PP cs to give the illusion of a very small border. Then I adhered it to the dsp. I punched out the glossy white with the dotted scallop ribbon border and ran it through the crimper. Love that thing. It makes it look like real ribbon so you can make ribbon any color that you have in card stock. Then I punched once with the Lace Ribbon Border in Pretty in Pink. Gorgeous. Took the 3/4" circle punch and punched out a perfect little flower from the center. I wanted to back it with the Melon Mambo but the 1/2" circle wasn't quite large enough so I used the flower from the Boho Blossoms punch. It worked great. Added the basic pearl. and that's it.
Stamps: Delicate Doilies
Ink: Melon Mambo ink pad and marker, Pretty in Pink, Regal Rose
Paper: Melon Mambo, Pink Pirouette, Brights Patterns dsp stack, Glossy White
Tools: Dotted Scallop Ribbon Border punch, Boho Blossoms punch, Lace Ribbon Border punch ( This is the little flower on the ribbon), 3/4" circle punch, basic pearls
Posted by Picasa

Friday, July 29, 2011

2nd Christmas Card


Here it is, similar to the other one but different. I still have quite a bit of the Holly Jolly Chirstmas dsp, which is lovely, but I want you to know that a pack of designer series paper has a lot of paper in them. I have used this for two projects in my classes and lots of personal projects and I still have full sheets. You really get your moneys worth when you get a pack of it.
The poinsettia is the star of this card, the embossed flowers in the background are more subtle because I did nothing to highlight them so the big flower really pops. A simple sentiment and the dotted ribbon border, which turns any cardstock into a ribbon, which I love, it keeps it flat for mailing. Speaking of that, when my husband saw this card he said, how's that going to mail. Beautifully. The flower completeing flattens out and it will slip into an envelope very easily and when your recipient receives it they can leave it like it comes or you could include a little instruction sheet in the card to pinch each leaf for more 3 d effect. These little flowers hold up, they are strong. and they sparkle real nice in real life as they have a coating of smooch spray on them.
I used Stickles for the 3 centers on this but you could use small gold brads, or basic jewels, or even card stock punched out with the smallest of our circle punches 1/16".

Supplies:
Stamps: Contempo Christmas
Paper: Card stoce Old Olive, Cherry Cobbler, whisper white, and Holly Jolly dsp
Ink: Cherry Cobbler
Tools: Big Shot, Petals-a-plenty embossing folder, 5 petal flower punch, Scallop border punch, Dotted scallop ribbon border punch
If you have any questions email me. Thanks for stopping by At Paula's Place

Posted by Picasa

Wednesday, July 13, 2011

Stamping 411 Challenge 211


Here we are at another challenge from Stamping 411. I really appreciate the operators over there. They come up with the greatest sketches and keep me inspired to keep creating. This is my favorite sketch so far. Here is what I did.
The base of the card is Melon Mambo. Cut to  4 1/4" wide  x 11", scored at 5 1/2"
Then I used the Dotted Ribbon Border Punch on basic black and made instant ribbon, (love that punch)
Layer 2: 3 1/2" square of Newsprint dsp matted with a piece of basic black cs 1/8" larger
Layer 3: 3 x 1 1/4"piece of Newsprint dsp matted with a piece of basic black cs 1/8" larger
Layer 4: I stamped black onto Melon Mambo using one of the frames from Four Frames stamp set. I also stamped onto Melon Mambo using Punch Potpourri stamp set (retired Hostess set) the three flowers. and punched them out with Boho Blossoms punch. I added a rhinestone and dimensionals to the back of the frame.
If you have any questions let me know. Thanks for stopping by At Paula's Place.
Posted by Picasa

Wednesday, June 15, 2011

Stamping 411 challenge 207

Hello to everyone. It's time for another 411 challenge and this one came together fairly easy. I reached for my favorite colors, Pretty in Pink and Concord Crush, always has to be a purple in the mix.
 Used a retiring dsp. bye bye Lap of Luxury, I have really enjoyed having you around. Used Baroque Motifs stamp set, the large and small scallop circle punch, the flower from Itty Bitty punch pak, and the Dotted Ribbon border punch, which makes any card stock into a neat little ribbon. I also crimped it for some added dimension. And bling, I love bling, the Basic Rhinestone in the middle of the flower should have a sparkle coming out of it. It does in real life.
If you have never tried making a card from a sketch you should. It's like cooking with a recipe or sewing with a pattern. Just add the fabric you want and viola a card comes out in no time. They even give you the dimensions of each layer. It's a lot of fun.
If you have any questions or want to order anything you can always leave a comment or email me.
Thanks for stopping by At Paula's Place.
Posted by Picasa

Friday, December 17, 2010

Christmas Cardinal on a Quilt


Blythe Klipple sent me the instructions to make this card in her 12 days of Christmas. As soon as I saw it I knew that I would be making this and showing my stampers how to do it. I love the quilt look with the double run through the Big Shot. Here is her blog.  I will post the instructions here also. I changed the sentiment, I think tidings of comfort just go along with the quilt look. My mom is a quilter and I made sure she got this card for her Christmas card from me.
SUPPLIES


STAMPS: Word Play clear (120651), wood (120308)

INK: Cherry Cobbler (119669)

CARD STOCK: Old Olive (100702), Cherry Cobbler (119685), Very Vanilla (101650), Daffodil Delight (119683), Garden Green (102584), Basic Black (121045)

ACCESSORIES: Big Shot Die-Cutting Machine (113439), Top Note Die (113463), 11/4" Square Large punch (119865), Jolly Holiday Designer Series Paper (117159), Petals-a-Plenty Embossing Folder (116824), Dotted Scallop Ribbon Border Punch (119275), 1-3/8" Circle Large Punch (119860), Heart Small Punch (117193), Two-Step Owl Extra-Large Punch (118074), Two-Step Bird Extra-Large Punch (117191), 2" x 1-3/8" Oval Extra-Large Punch (119859), Stamping Sponges (101610), Anywhere Glue Stick (104045), Snail Adhesive (104332), Stampin' Dimensionals (104430)

INSTRUCTIONS

To make the card:

1. Cut a piece of " Cherry Cobbler card stock 5-1/2" x 8-1/2" for your card base. Fold this in half.

2. Cut a 5-1/2" strip of Old Olive card stock and punch a border using the Dotted Scallop Ribbon border punch. Adhere this to card front horizontally in center.

3. Cut a piece of Very Vanilla card stock 5" X 4-1/2" . Punch out 12 squares of designer series paper using the 11/4" Square Punch. Adhere in random order onto the piece of Very Vanilla card stock. I have found it easier to "smear" the Anywhere Glue Stick onto the base card stock, in this case, Very Vanilla. I chose to 'smear' mine glue stick as I go, not all at once. Then attach your squares.

4. Run this piece of Very Vanilla card stock through the Big Shot Die-Cutting Machine using the Top Note die. Take this cut out piece and then run it back through the Big Shot Die-Cutting Machine using the Petals-a-Plenty Embossing Folder. Adhere to your card.

To make the bird:

5. Punch a circle from Cherry Cobbler card stock using the 1-3/8" Circle Large Punch. Cut this in half in an arc shape. Punch a heart from Cherry Cobbler card stock using the Heart Small Punch. Adhere this one to the bottom back half of the half circle forming a tail.

6. Cut a 1" square from Basic Black card stock. Adhere to front of bird head and trim. Cut a 1" square from Daffodil Delight card stock. Cut in half and adhere to back of bird head to form beak. Punch out smallest circle from Two-Step Owl Extra-Large Punch and adhere to bird head for eye.

7. Punch out the branch from the Two-Step Bird Extra-Large Punch using Garden Green card stock. Adhere this to card front. Adhere bird so he's sitting on the branch.

8. Stamp Joy from the Word Play Stamp Set onto Very Vanilla card stock in Cherry Cobbler ink. Punch out, using Extra Large Oval Punch. Using Stamping Sponges, sponge around edges. Adhere to card front using Stampin' Dimensionals.

9. You’re done.


Please leave a comment so I know you came by to visit and what you think.
Thanks for stopping by At Paula's Place.
Posted by Picasa

Monday, December 13, 2010

My Christmas Card


Hello everyone. Thanks for stopping by today. Now that all my Chirstmas cards have been mailed or handed out I thought it would be nice to share with you what I sent out. I think I made 84 of these design. I sent out 106 so the majority got this one.
I used natural white card stock for the base of the card and got the natural white envelopes to match.
The stamp set is Tree Trimmings and
The colors I used are Wild Wasabi, Poppy Parade and Concord Crush. Each color was used for one of the ornaments and one of the elements on the card.
This card is pretty self explanatory but
If you have any questions let me know.
Thanks for stopping by At Paula's Place. Leave a comment to let me know you were here and what you thought.
Posted by Picasa

Friday, November 12, 2010

Third 3"x3" Card


And finally the third card that fits into the pizza box. I like each one better than the last one. I got these ideas from Regional Seminar right from Stampin' Up. I modified them a little to fit my needs.
Crumb Cake cs was used for the base 3" x 6" folded in half. I took a piece of Whisper White cs 3" x 3" and stamped the tri flower 3 times in Wild Wasabi and the Thank You in Chocolate Chip. Then I tore the top off to give it some texture and attached it to the card base. I added a piece of Chocolate Chip 1/4" grosgain ribbon and right underneath that I added a border of So Saffron Dotted Scallop Ribbon Border made with the punch of the same name. These cards were fun and easy to make and I can't wait to see the face of the happy recipient of them when I give them to her. She will love them.
As always if there are any questions or if something isn't clear let me know by leaving a comment.
Thanks for stopping by At Paula's Place.
Posted by Picasa

Wednesday, September 22, 2010

Fifth Avenue Floral


Today I decided to case a card right out of the Idea Book & Catalog. It really does have great ideas and suggestions. This one is found on page 122. I changed it up a bit. I think that stamping the rose onto colored card stock gives the flower a much richer look.

What I did was this:

Supplies:

Stamps: Fifth Avenue Floral

Paper: Perfect plum cs, Crumb Cake cs, So Saffron cs.

Ink: Basic black, Perfect plum marker

Tools: paper snips, dotted scallop ribbon punch, scallop trim border punch


I used a piece measuring 8 1/2" x 4 1/4" of perfect plum cs for the card. Fold in half.

Crumb Cake cs measures 4 1/4" x4 1/4"

So Saffron is 4 1/4" x 3/4"

Perfect Plum 4 1/4" wide and at least 3/4" high to run through the ribbon border punch. I love this punch, it allows you to make ribbon out of any color card stock that you have.

Then on scraps of both Crumb Cake and Perfect Plum I stamped all three flowers in Basic Black ink and then cut them out. I stamped the message at the top of the crumb cake cs. and adhered the smallest flower in the center and put the other two flowers on with dimensionals. I also shaded the rose with the perfect plum marker along the lines of the rose. It really gives it depth and makes it pop out like 3-D. Assemble the rest and send this to someone you care about.
If you would like to place an order email me at paularough1@gmail.com and I would be happy to help you .
Thanks for stopping by At Paula's Place.
Please leave a comment so I know that you were visiting me. Thank you