Showing posts with label Christmas. Show all posts

Friday, December 24, 2010

Holly Jolly Box


One more Christmas project before I bid adui to them until next year. Hear is a box that is made with one 12 x 12 piece of card stock. It holds at least a dozen A4 cards with envelopes. It's easy to do.
12 x 12 piece of card stock

Score at 3’ & 9” then turn and score at 4 ½’ & 7 ½”

Fold on all score lines. Fold corners to a point. Scoreline to scoreline and crease. Use binder clips to hold together. Both sides should go in same direction.

Line up top even and staple on each side

Attach DSP panels: use snail glue

Front 5 ¾” sides 4 ½” x 2 ¾” (Need 2)

Lid: 5 1/8” x 8 1/8” card stock. Score on all four sides at 1”, crase. Cut to score line on the long side up to the score line. 2 on each side. Mono adhesive on all 4 tabs adhere tabs to form lid. Attach DSP to lid, contrasting to box. Front: 5 ¾” x ¾” sides 2 ¾” x ¾” (need 2)

Image Panel” 4” x 2 5/8” Stamp appropriate image

Angie Juda has a video on how to do this at Chic n scratch

You could put a small gift in here or use this instead of a stocking. Have fun and Merry Christmas
Thanks for stopping by At Paula's Place.

Posted by Picasa

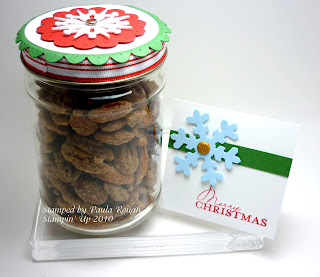
Jar of Nuts with card


This is a picture of the jar of Swedish nuts that I gave our preacher's family on Sunday. Sue, wife of preacher, gave us a beautiful big tray of homemade cookies and candies. She makes like 200 dozen cookies each year and gives them away. We are fortunate to be on the receiving end of that. I thought it would be nice to give a little back this year. They are tasty and easy to make.

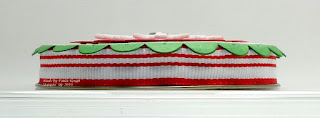
  • The lid was decorated with Real Red striped ribbon (retired) but on the clearance rack, attached with sticky strip.
  • I used the large scallop circle from the #2 circle die in garden green.
  • Then cut out a 1 3/4" whisper white circle using the circle scissors. Love that thing
  • Then punched a real red scallop circle with the 2 3/8'" scallop circle extra large punch
  • I attached a snowflake, also from the clearance rack, with a round fire brad. From the bundles that were available last month. What great deals.
  • I pierced holes in all the scallops and sort of bent the green ones over the side of the lid.
  • I attached the circle with Mono adhesive.
  • TIP: If you use mono adhesive to put things together you have a few seconds to move things around to get them just right and once it is dry, boy does it ever stick good.
  • The jar is reused from Smucker's Natural peanut butter. My husband eats a jar a week so next year I am going to save a lot more and give these as gifts. I only made two this year but I am real happy with the results.
  • Here is the recipe for Swedish Nuts, I got this from my friend Karen. She is a great cook.
  • Preheat oven to 225 degrees
  • 1 lb. nuts (4 c. pecans + 1 1/4 c almonds)
  • /2 c sugar
  • 1/2 tsp. salt
  • 1/2 tsp. cinnamon
  • 1 egg white
  • 1 tbsp. water
  • Toss nuts with egg whites and water. Mix well. Add dry ingredients and mix. Bake on cookie sheet stirring every 15 min. for one hour.
Any questions email me. Please leave a comment if you like this.
Well, thanks for stopping by At Paula's Place.
Posted by Picasa

Thursday, December 23, 2010

Tiny Teacup Joy


Here is another Christmas card and something I love. With just a couple of changes, color and sentiment you could use this card for any occasion. Mary Fish had this on her blog and I cased it almost completely. I changed the bow a bit and the brad (retired) which matches the cup perfectly. 
 
Unlike Mary I did do surgery on my Tiny Teacup stamp. When I received it the cup and hello are on the same piece of rubber. I slipped my craft and rubber scissors right through the middle of them and mounted hello on the side of the stamp, in essence making two stamp out of one small one. Also making it easier for stamping just the cup. Just be careful when you do this not to cut any vital organs. 
The small ornament on the sentiment was stamped again on garden green and punched out with the 1/2" circle punch and the on real red and snipped out. It really adds a punch of color. 
 
If you need anything email me and I will be happy to help you. If you have a demonstrator please contact her.

Thanks for stopping by At Paula's Place. 


Contempo Christmas in Rose Red


Here is the same card which I posted here except for a color change. This is truly monochromatic. I love the simplicity and the Rose Red color. Curly Cute is turning out to be a favorite set of mine. It has good variety and I can see myself using it all year long.
Tip: When you stamp your ornament make sure of two things, first that the stamp is inked up real good and second that you have enough card stock to be able to hold on to it when you punch it out.

Don't miss the basic pearls on the ornament, they add a touch of class.

The paper is retired but can be substituted with any coordinating designer series paper and this can be done in any color, endless possibilities.

Thanks for stopping by At Paula's Place.
Posted by Picasa

Monday, December 20, 2010

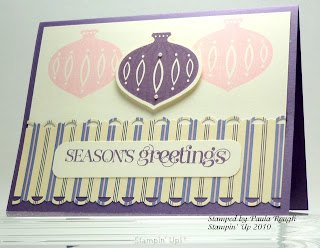
Contempo Christmas in Perfect Plum


Here is another card we made in my November class. It's simple design accents the ornament  and I think the stripes play off the stipes on the ornament.
Stamps: Contemporary Christmas, Curly Cute
Ink: Perfect Plum, Pretty in Pink
Paper: Perfect Plum cs, Very Vanilla cs, Lap of Luxury dsp
Tools: Ornament Punch, Corner Rounder, Scallop Trim Border Punch, Paper Snips (for placement of pearls)
Accessories: Basic Pearls, dimensionals
Tip: I used the clear mount stamp set so when I mounted the ornament to stamp the pink ornaments I positioned it so when I lined up the edge of the clear block with the edge of the vanilla card stock the ornament was placed just right.
If you have any questions let me know.

Thanks for stopping by At Paula's Place.
Posted by Picasa

Monday, December 13, 2010

My Christmas Card


Hello everyone. Thanks for stopping by today. Now that all my Chirstmas cards have been mailed or handed out I thought it would be nice to share with you what I sent out. I think I made 84 of these design. I sent out 106 so the majority got this one.
I used natural white card stock for the base of the card and got the natural white envelopes to match.
The stamp set is Tree Trimmings and
The colors I used are Wild Wasabi, Poppy Parade and Concord Crush. Each color was used for one of the ornaments and one of the elements on the card.
This card is pretty self explanatory but
If you have any questions let me know.
Thanks for stopping by At Paula's Place. Leave a comment to let me know you were here and what you thought.
Posted by Picasa

Thursday, August 20, 2009

Sketch Challenge SC242

Another challenge from SplitCoastStampers. Each Wednesday they have a card challenge and I like to take part in it. It really stretches me to use layouts that I would not normally use. You can take part too. Here is the link They keep the current challenge up top until the next week and then you can find the challenge you want by looking for the number.

Here is the card that I made.
I knew I wanted to use the Dasher stamp, it's so cute, so I started with that.
  • First I stamped Dasher onto whisper white cs 1 7/8 x 2 3/4. Then with 2 way glue traced his antlers and sprinkled glitter on them. Let that dry well. Then back it with sage shadow cs.
  • I used To The Nines dsp for 2 of the layers. #2 & 4 if you check the sketch. #2, 1 1/16 x 4 and #4, 2 x 3 1/4
  • Look at panel #3. The white one with the sage swirlys. Look closely, can you figure out how I made that design. okay. I'll tell you. I used Dasher's antlers and the stamp-a-ma-jig. It matches perfectly with Dasher. That panel measures 1 3/8 x 5.
  • Then I backed all the panels with choc chip cs
  • The card base is 4 x 5 1/4 and backed with choc chip 4 1/4 x 5 1/2. So the sage card opens but the choc chip backing stays in place.
If you have any questions email me or leave a comment here on this post. Here is the card sketch for you to compare mine with. Here is the link to my gallery at SCS so you can look at all my cards at once and see what others are saying about them.
Thanks for stopping by At Paula's Place.

Supplies:
Stamp Set: Dasher 116816
Paper: Sage Shadow cs 101563, Whisper White cs 100730, Chocolate Chip cs 102128, To The Nines dsp 114038
Tools: 2 way glue 100425
Ink: chocolate chip 100908, sage shadow 102532
Embellishments: Dazzling Diamonds Stampin' Glitter 102023