Showing posts with label Lace Ribbon Border punch. Show all posts

Tuesday, October 18, 2011

Stamping 411 chllenge 225


I know it's been a while since I blogged but I'm hoping this card makes up for it. I am back from my trip to Nashville and stamping again. Being away always makes me want to get back to start stamping again. Over at Stamping 411 this week they have a wonderful sketch for everyone to start with and they give measurements for the different layers too so putting a card together is fairly easy. I love how this rose just pops off the page, it's probably one of the last roses we'll see for a while. It's getting cold here. Let me know if you have any questions
Supplies:
Stamps: Fifth Avenue Floral, Petite Pairs
Paper: Early Espresso, Regal Rose, Rose Red, Old Olive, Retired dsp
Ink: Basic Black, Regal Rose marker, Rose Red marker
Accessories: Old Olive organza ribbon, Jewelry tag punch, linen thread, litte leaves sizzlit die, Lace Ribbon Border punch, Paper Piercer

Posted by Picasa

Wednesday, September 14, 2011

Stamping 411 challenge 220


When I finished this card I realized that it is very appropriate for fall. I am happy with how this turned out. The sketches over at Stamping 411 sure do help when putting a card together and coupled with the Color Coach it's just down right simple.
Here are the measurements:
  1. Layer One -- Cardstock cut at 5.5 x 8.5", scored and folded to make your Card Base
  2. Layer Two -- DSP cut at 4 x 5.25". Trim again at 2", reverse the pattern and use both sides of the DSP. Separate with a ribbon or strip of cardstock or paper.
  3. Layer Three -- Cardstock cut at 3.75 "x 2.5"
  4. Layer Four -- DSP cut at 3.5" x 2.25" -- embellish with a circular or other shape -- add brads, to the corners.
I used Tempting Turquiose, Tangerine Tango and Old Olive for my colors. If you have any questions let me know. Thanks for stopping by At Paula's Place.

Posted by Picasa

Tuesday, August 23, 2011

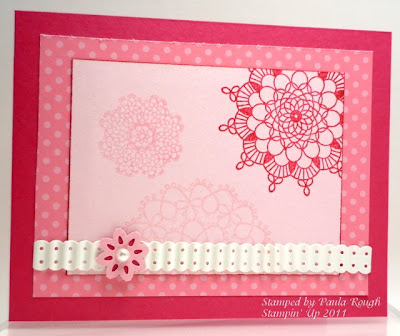
411 Challenge 217 Pink Doilies

Sometimes you just have to flip that sketch. I stamped that big Melon Mambo doily up in the corner then realized that it needed to be opposite my punched image so I just flipped it from the right side to the left. I like it. Do you know what the punched image is? I know it's a cute little flower but are you looking at your punches wondering if you own it? I'll  tell you what it is in a minute.
There are two challenges over at Stamping 411 this week. This is the first. Here are the dimensions.
Base: 1 1 x 4 1/4", scored and folded in half at 5 1/2"
Layer 2: 4 7/8" x 3 5/8"
Layer 3: 3x4"
Layer 4: Ribbon or cardstock
Layer 5: ANY shape punch

This is what I did. I scored and folded a piece of Melon Mambo cs 11 x 4 1/4 for the base. Added a piece of dsp from the brights dsp stack in Regal Rose, then a piece of Pink Pirouette was stamped with doilies, the large one in Melon Mambo. the small in Pretty in Pink  and the other large one in Pink Pirouette. Then I used the Melon Mambo marker to outline the edge of PP cs to give the illusion of a very small border. Then I adhered it to the dsp. I punched out the glossy white with the dotted scallop ribbon border and ran it through the crimper. Love that thing. It makes it look like real ribbon so you can make ribbon any color that you have in card stock. Then I punched once with the Lace Ribbon Border in Pretty in Pink. Gorgeous. Took the 3/4" circle punch and punched out a perfect little flower from the center. I wanted to back it with the Melon Mambo but the 1/2" circle wasn't quite large enough so I used the flower from the Boho Blossoms punch. It worked great. Added the basic pearl. and that's it.
Stamps: Delicate Doilies
Ink: Melon Mambo ink pad and marker, Pretty in Pink, Regal Rose
Paper: Melon Mambo, Pink Pirouette, Brights Patterns dsp stack, Glossy White
Tools: Dotted Scallop Ribbon Border punch, Boho Blossoms punch, Lace Ribbon Border punch ( This is the little flower on the ribbon), 3/4" circle punch, basic pearls
Posted by Picasa