Showing posts with label Curly Cute. Show all posts

Tuesday, October 23, 2012

Medallion with Bling


Hello, it's been a while so before I take off for a week's vacation I thought I would leave you with this pretty card. Andrea Walford designed it and you can find it on her blog but I have made about a dozen of these for a sick friend and several birthdays. I think it really packs a wow punch with not a lot of effort. This card uses one of the medallions from Mixed Bunch and any sentiment from Curly Cute. You can choose any color you like, this is retired Marvelous Magenta, which has always been one of my favorites, but Melon Mambo works great too. The black really shows up nicely and I did use Basic Black, I find that on colored card stock it works wonderfully. I used Stazon Black for the sentiment. I also used basic rhinestones in the center of each medallion and dazzling Details on the outer ring for bling but you could use all rhinestones. I hope you give this a try, Use your stamp-a-ma-jig and start with the ones in the center and work outward for better placement. 
Thanks for stopping by At Paula's Place. 
Posted by Picasa

Monday, August 29, 2011

Quilt out of Lattice Die Green and Pink


Here is the opposite of what I posted yesterday. This one is quilted with the square lattice die so it's a double lattice quilt card. I think this card would be especially nice for a quilter for her birthday but certainly appropriate for anyone celebrating their birthday.
The piece of designer series paper that the lattice was cut out of measures 3 1/2" x 3 1/2". Then I added a piece of Pretty in Pink on top 3 1/2" x 3/4" and the bottom was 1" wide then punched with the border punch. Adhere all together.
Supplies:
Stamps: Curly Cute
Ink: Wild Wasabi
Paper: Tea Party dsp?, Pretty in Pink, Wild Wasabi cs
Tools: Eyelet Border Punch, Big Shot, Bigz Lattice Die, Square Lattice embossing folder
Thanks for stopping by At Paula's Place.

Posted by Picasa

Sunday, August 28, 2011

Quilt out of Lattice Die

 Wow, this quilting with paper is really fun and fast. I have made 3 quilts now with fabric and they take weeks to complete. A card quilt made with paper and a few supplies takes only minutes. Especially with this lattice die. I ran a piece of dsp through the Big Shot with the lattice die and then flipped the pink lattice section over and this is the result. You have to glue each piece down individually but with 2 way glue  it moves only rather quickly. after the glue was dry I did then run it through the Big Shot again with finial press ef.  I put a fancy border edge on my card stock and stamped that pretty little sentiment on and my card was done. I didn't want to put too much on the front of this card because I didn't want to take away from the beauty of the quilt itself.
Here is the list of
Supplies:
Stamps: Curly Cute
Ink: Basic Black
Paper: I think it's Tea Party retired, Pretty in Pink, Wild Wasabi cs
Tools: Big Shot, Finial Press ef, Bigz Lattice die, Eyelet Border punch
Thanks for stopping by At Paula's Place.
 Posted by Picasa

Monday, June 6, 2011

Lap of Luxury Birthday

My grand niece turns 8 this month and she will be receiving this card with a little present tucked inside. This Lap of Luxury dsp has been one of my all time favorite papers to work with. I love purple and a whole stack of designs with purple as a main color in the form of Concord Crush has been a delight. And I am so happy that the In Colors get to hang around for another whole year. That is super. This is one of the items on the last chance accessories list so you have to act fast if you want your own beautiful paper to play with.
  • Also here you can see how the new Blossom Bouquet triple layer punch looks when it is set on all 3 layers. Makes a perfect center for the Bigz clear Flower die.
  • Also used is the branch from the 2-step Bird Punch and that is the Holly Jolly dsp you see.
  • I used the Itty Bitty Shape Punch Pak to get the small center of the flower
  • Then topped it off with a Basic Rhinestone.
  • The Curly Cute stamp set was usedalong with Concord Crush ink for the sentiment and curved with the bone folder.
  • To get that perfect end to the banner I cut a straight piece of Whisper White cardstock and used the corner of the 1 1/4" square punch to give it a nice tail.
  • It all sits on the base card of Pretty in Pink.
Thanks for stopping by At Paula's Place.
Posted by Picasa

Friday, February 11, 2011

Blown away hearts


I love this card and I made it, sometimes we surprise even ourselves. Last year I had the priveledge of attending a Michelle Zindorf brayer class and I learned her technique of brayering. I check her blog once in a while and cased this card from there. It's not hard you just have to know how to do it. It was a three hour class so for me to explain it to you would not be practical.
Here is the inside

I am giving this card to my grand niece this weekend. Her birthday is on Valentine's Day and this would make a great Valentine card also with just a change of sentiment.

Supplies I used:
Stamps: Curly Cute, Confetti

Paper: Stampin’ Up! Whisper White, Melon Mambo and Always Artichoke


Ink: Stampin’ Up! Tempting Turquoise, Early Espresso, Melon Mambo, Not Quite Navy, Old Olive & Daffodil Delight

Accessories: Stampin’ Up! Sponges, Ribbon, Always Artichoke and Rose Red Markers, Heart to heart & Bird Punches, Brayer, Mat pack & Piercing Tool, Button.

If you like this card leave me a comment here and let me know. If you have any questions let me know.
Thanks for stopping by At Paula's Place.
Posted by Picasa

Thursday, December 23, 2010

Contempo Christmas in Rose Red


Here is the same card which I posted here except for a color change. This is truly monochromatic. I love the simplicity and the Rose Red color. Curly Cute is turning out to be a favorite set of mine. It has good variety and I can see myself using it all year long.
Tip: When you stamp your ornament make sure of two things, first that the stamp is inked up real good and second that you have enough card stock to be able to hold on to it when you punch it out.

Don't miss the basic pearls on the ornament, they add a touch of class.

The paper is retired but can be substituted with any coordinating designer series paper and this can be done in any color, endless possibilities.

Thanks for stopping by At Paula's Place.
Posted by Picasa

Monday, December 20, 2010

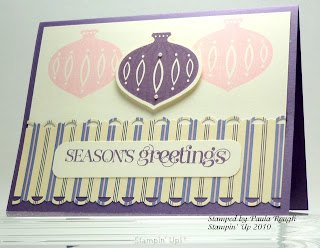
Contempo Christmas in Perfect Plum


Here is another card we made in my November class. It's simple design accents the ornament  and I think the stripes play off the stipes on the ornament.
Stamps: Contemporary Christmas, Curly Cute
Ink: Perfect Plum, Pretty in Pink
Paper: Perfect Plum cs, Very Vanilla cs, Lap of Luxury dsp
Tools: Ornament Punch, Corner Rounder, Scallop Trim Border Punch, Paper Snips (for placement of pearls)
Accessories: Basic Pearls, dimensionals
Tip: I used the clear mount stamp set so when I mounted the ornament to stamp the pink ornaments I positioned it so when I lined up the edge of the clear block with the edge of the vanilla card stock the ornament was placed just right.
If you have any questions let me know.

Thanks for stopping by At Paula's Place.
Posted by Picasa

Wednesday, September 29, 2010

DD Birthday Card

I am very excited about my post today. I got these elegant trio stencils a while back but had not put them to work until I wanted a unique card for my daughter. Her birthday was on Saturday and I like to make something special for my children and she is visiting with us for a couple of weeks after being in China for eight months so I wanted it to be really special. Here it is.
I used 3 different inks and I really like how this turned out. I hope you do too. Please let me know by leaving a comment.

Supplies:

Stamps: Curly Cute, Apple Blossoms

Paper: Very Vanilla cs, Cajun Craze cs

Ink: More Mustard, Cajun Craze, Cherry Cobbler

Tools: Decor Elements Elegant Trio Stencils, Sponges

Thanks for stopping by At Paula's Place