Showing posts with label Ornament punch. Show all posts

Monday, March 12, 2012

A Card for a Friend and a Challenge


I am so happy to be back posting a challenge card from Stamping 411. I had started by stamping this flower from Fifth Ave floral stamp set and coloring it by outlining with Elegant Eggplant marker and filling in with blender pen, then I cut them out. My friend, Kye Ann, yes pronounced like the pepper, asked me what I was going to do with those flowers and I said I have no idea. But when I started putting them on background paper they looked best on white and I wanted black and I matted it with black and it just came together easily. I ran the "vase" through the Big Shot inside the Elegant Lines embossing folder to get texture onto the vase.
The recipient of this card loves purple and loves pansies so I hope this card makes her very happy.
Supplies:
Stamps: Fifth Avenue Floral
Ink: Basic Black, Elegant Eggplant, Daffodil Delight, More Mustard, Pear Pazzaz
Paper: Pear Pazzaz, Basic Black, Whisper White, Daffodil Delight
Tools: Paper Snips, 2-step Bird punch, Ornament Punch, Scallop Trim border punch, Elegant Lines ef, Big Shot, sponge, corner rounder, dimensionals

That's it for now, remember it's Saleabration time and time is running out. If you order $50 worth of product you will receive a FREE item. Check out the catalogs on my sidebar to see what you can get.
Thanks for stopping by At Paula's Place.
Posted by Picasa

Tuesday, November 22, 2011

Stamping 411 Challenge #230


Here's another sketch challenge from Stamping 411. I love their ideas and layouts, they are so helpful. Of course I chose to do another Christmas card. I really like this one, I hope you do too.
The ornament was sort of a mistake saved. I had used the vintage wallpaper ef on glossy card stock and then brayered wild wasabi onto the raised part of it. But the color was bad. It turned darker than I wanted it on that glossy paper. So I flipped it over and brayered the wasabi ink on the background and the white is depressed. Then I punched out the ornament shape and filled in the white with glitter and my 2 way glue.

Supplies:
Stamps: Baroque Motifs, Teeny Tiny wishes
Ink: Rose Red, Wild Wasabi
Paper:Wild Wasabi, Rose Red, Whisper White, White Glossy
Tools: Ornament Punch, Scallop Squares Duo Die & Big Shot, Vintage Wallpaper ef, silver cord, sponge, Modern Label punch, Word Window Punch, Basic Rhinestones, Dazzling Diamonds Glitter, 2 way glue, Paper Piercer, Mat pack,

If you have any questions about how I did anything let me know. I do wish that the glitter and the rhinestones would show up better in the picture though. Thanks for stopping by At Paula's Place.
Posted by Picasa

Tuesday, November 8, 2011

Stamping 411 Challenge 228

Thanks to all the Operators over at Stamping 411 for choosing my card to be featured in the stamper's showcase. You all are wonderful and I appreciate all your hard work.


Here is the Stamping 411 sketch challenge 228 for this week. I love going over there and checking out what everyone else is doing with these but mostly I appreciate all their hard work to come up with these sketches which gives me someplace to start. To want to make a card and start with a blank sheet of card stock it makes it infinately easier if you have a direction to go. There are endless possibilities out there so we have to have somewhere to start. The sketches they provide do this for us. Then we just add the stamps and ink and things come together so great.
Look at it like this. You have 2 yards of fabric. It's laying on a table flat ready to be made into something. You wouldn't start randomly cutting on that fabric and hope something nice comes out of it. You get a pattern, whether it's for an apron, a pair of pants, a dress, a jacket, whatever it is you want to make you use the correct pattern, you lay it out on the fabric and cut it out accordingly. Same with card making. If we start with a sketch, or pattern, it makes it go a lot easier.
I combined the sketch with the color inspiration challenge 164. I smooch sprayed the ornament, which is hard to see in the photo, after I ran it through the Big shot with the petals-a-plenty ef. I used markers and blender pen to color the image which was stamped with stazon ink. I sponged the sky then used 2 way glue pen to apply the dazzling diamonds glitter. So it really sparkles. The little snowflake was cut with the Northern Frost strip die. I think everything else is pretty obvious. Let me know if you have any questions. Thanks for stopping by At Paula's Place
Supplies:
Stamps: Greeting Card Kids, Snow Flurries, Contempo Christmas
Paper: Lucky Limeade, Riding Hood Red, Early Espresso, Whisper White
Ink: Lucky Limeade, Riding Hood Red, Early Espresso, Daffodil Delight, Pink Pirouette, Blushing Bride, Bashful Blue
Tools: Ornament Punch, Petals-a-Plenty embossing folder, Boho Blossom Punch, Dazzling Diamond glitter, 2-way glue, sponge, smooch spray, Northern Frost strip die, Big Shot, Silver cord
Posted by Picasa

Thursday, December 23, 2010

Contempo Christmas Squared


It's getting really close to Christmas so I'm going to try to get several posts up today. Here is a card I made only one of. I like it but with the large filigree brad sort of hard to mail. So I gave it to a friend when I was with her. I love the Contempo set and this card goes together very fast. Check out the rhinestone on the ornament. It gives a very simple card a little more bling. Woohoo. I love bling.

If you have any questions let me know, thanks for stopping by At Paula's Place. Come back real soon.

Monday, December 20, 2010

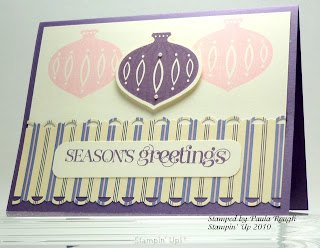
Contempo Christmas in Perfect Plum


Here is another card we made in my November class. It's simple design accents the ornament  and I think the stripes play off the stipes on the ornament.
Stamps: Contemporary Christmas, Curly Cute
Ink: Perfect Plum, Pretty in Pink
Paper: Perfect Plum cs, Very Vanilla cs, Lap of Luxury dsp
Tools: Ornament Punch, Corner Rounder, Scallop Trim Border Punch, Paper Snips (for placement of pearls)
Accessories: Basic Pearls, dimensionals
Tip: I used the clear mount stamp set so when I mounted the ornament to stamp the pink ornaments I positioned it so when I lined up the edge of the clear block with the edge of the vanilla card stock the ornament was placed just right.
If you have any questions let me know.

Thanks for stopping by At Paula's Place.
Posted by Picasa