Showing posts with label card. Show all posts

Monday, August 3, 2009

Upsy Daisy & Swirls Scribbles

This is the Wednesday Card sketch challenge from SCS. If you don't know about this site you have to check it out. Thousands of samples of cards and other paper craft items are displayed there. Any Stampin' Up set that goes back about 10 years is listed there. All kinds of tutorials, forums, resources, threads to talk about anything, places you can buy or sell stamps, clubs and groups. Well, as you can tell, I am so impressed with that site.

Every day they have a challenge and I have decided to participate in the Wednesday card sketch. You can find the details here on this one. It's SC239 so look for that in the thread if the date has been removed. I got this technique from Julie Buhler. She has a great tutorial on this. Click here for that.

  • I started with a yoyo yellow card 5 1/2" x 4 1/4".
  • The Lovely Lilac rectangles 1 1/2" x 3 3/4" back the basic black ones 1 1/4" x 3 1/2".
  • The image panel started out whisper white 3 3/8" x 2 3/8" and following the tutorial of reverse silhouette I ended up with the Upsy Daisy.
  • Which was then added with dimensionals
  • I backed that with Yoyo yellow 2 1/2" x3 1/2" and Lovely Lilac 2 7/8" x 3 7/8"
  • Then on the right side I added the burst of black squiggles from the sizzlit die scribbles swirls and arranged them in an appropriate pattern.
That's it for this one.
Thanks for stopping by At Paula's Place

Supplies:
Stamp Set:
Upsy Daisy 111710
Paper:Whisper White cs 100730, Basic Black 102851, Lovely Lilac 100427, Yoyo Yellow 102824
Tools: Paper Cutter 104152, brayer 102395 , heat tool 100005, Big Shot 113439, Scribbles, Swirls Sizzlits Die 113441
Ink:Basic Black 101179, yo yo yellow 102717, lovely lilac 102874, versaMark pad 102283
Embellishments: clear embossing powder

Friday, July 31, 2009

That Pretty Little Dress

I am so happy to share this card with you today. I found it here. It's just unique enough to catch the eye and for a little girl's birthday or an invitation to a tea this would be perfect. I have five great nieces and they will all be getting dresses for their birthday's next year. Imagine the colors and if dsp is added as an apron there are endless possibilities.
I found the template here.
  • I used Pretty in Pink and Regal Rose cs to cut out the template of the dress
  • Then I punched the eyelet border in whisper white for the hem and under the bodice.
  • I took a piece of regal rose and cut the piece for just above the waistline and under the hemline. Also to punch out the little heart at the neck.
  • How did I get the cute collar. Well, that is the scallop oval punch, then I just cut it to fit.
  • I stamped the dress's skirt with boho bg flower
  • I also added cross hatching to mimick smocking on the regal rose piece and glitter to the heart.
  • Glued it all together and sat back and smiled.
This was so satisfying I made another. More along the shabby style. Sponging the edges. Here the dress is cameo coral with Walk in the Park dsp, retired. I used the Boho blossoms punch for the pocketFor the collar I used basic gray and the scallop circle punch and then cut out the collar where needed. Then on this one I also bent the lace. If you look at the first one the eyelet lace on the bottom of the dress is straight across. On the second one is curved and follows the curve of the dress better. Let me know if you want to know how to do this. I want to here from you.
Thanks for stopping by At Paula's Place

Supplies:
Stamp Set: Boho Background 114940
Paper:
Whisper White 106529, Pretty In Pink 100459, Regal Rose 105130 Tools: Scallop Oval Punch 114889, Eyelet Border Punch 113692, Craft & Rubber Scissors 103179, little heart punch non SU Ink: Stampin' Write Markers; Regal Rose 105108 Ink Pads; Regal Rose 105211
2nd dress also uses Sahara Sand Classic Stampin' Pad 105208, Boho Blossoms Punch 110711, Scallop Circle Punch 109043

Friday, July 24, 2009

Thoughts and Prayers in Plum

Hi again. I love this card today and I hope you do too. This is a card a basically cased from Julie Buhler. She always has something special cooked up at her house.
  • The base of this card is perfect plum.
  • I made my own patterned paper for the next layer. I stamped the vanilla cs 5 1/4" x 4" with the script BG in perfect plum.
  • Then I stamped over that with the canvas BG in mellow moss.
  • The edges were sponged with close to cocoa.
  • I added the layer perfect plum on the left, 1 1/2" x 3 1/2", that had also been sponged with cocoa.
  • I used a strip of pale plum,5 1/4" x 1 1/4", that was sponged and faux stitched with a cocoa marker.
  • I tied the moss ribbon around that panel and added it to the card.
  • The image (Thoughts and Prayers) inked up with always artichoke, pale plum, and perfect plum markers. It was stamped on vanilla, 3 1/2" x 2 1/2", and sponged with cocoa.
  • It was matted on perfect plum, 3 3/4" x 2 3/4", then mellow moss cs, 4" x 3".
  • I punched perfect plum cs with the scallop oval punch
  • The sentiment was stamped on pale plum with perfect plum ink, and punched with the large oval and sponged it with cocoa then adhered to the scallop oval.
  • Then it was added to the image panel.
I made one of each of the sentiments but this one was then added to the card with dimensionals. Also the bow was tied then added.

Unfortunately I sent the Praying for You one out yesterday and I am sending the Sharing In Your Sorrow one out today. But I do hope in the struggles that my friends are facing they can have a bright spot in their day knowing that someone is thinking about them and that they get a little lift from these cards.

Thanks for stopping by At Paula's Place.

Supplies:
Stamp Set: Thoughts and Prayers 113252
Paper:
Mellow Moss cs
102898, Pale Plum 101658, Perfect Plum cs 101889,
Very Vanilla cs
101650
Tools: Paper Cutter 104152, Mat Pack 105826, Paper-Piercing Tool 116631, Stamping Sponges 101610, Scallop Oval Punch 114889, Large Oval Punch 107305
Ink: Stampin' Write Markers; Always Artichoke 105113, Chocolate Chip 100071, Perfect Plum 100035 Ink Pads; Mellow Moss 102774, Perfect Plum 101437, Close To Cocoa 103139
Embellishments: Stampin' Dimensionals 104430, Ribbon

Wednesday, July 22, 2009

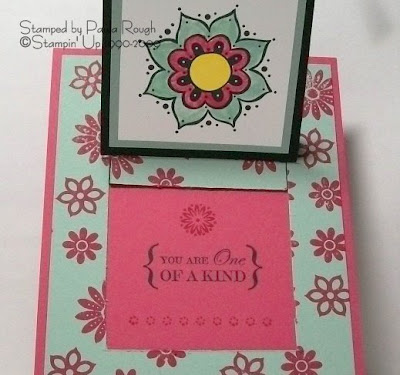
One of a Kind Pull Card

I hope everyone is enjoying summer where they are. Here in Wisconsin we are having the coolest summer on record. Today it hit 75 degrees and I am a happy camper. Not very hot but warm enough not to wear a jacket. I love hot weather and try to get outside and enjoy it. Bob and I went for a long walk today and got some exercise and it's a wonderful time to talk with each other too.

Well, on to the card. Today I have a pull card. Like anything else we do at stamping at first it may look complicated but once you know how to do it it is very simple. The one thing I will stress when you are making a pull card is to use sticky strip or sometime when someone is pulling that tab it might just fall apart.So this is how you do it.
  • First on a piece of cs 4 " x 5 1/4" you stamp a bg on it. Here sage shadow cs is used and rose red ink
  • cut out the sides and the bottom of a rectangle right in the center. That measures 2 1/2" x 3 1/4"
  • punch half a circle out in the middle at the top
  • Then score in 3 places. One at the top of the rectangle, another in the middle and the last one is just 1/2" from the bottom. Only as wide as the cut out part
  • Cut a tab which measures 2 1/2" x 5" in basic black
  • Using the tag corner punch on the tab cut the corners off
  • Punch a hole right in the center with 1/4" punch and add ribbon
  • Attach the tab to the bottom of the rectangle on the inside using sticky strip
  • Put sticky strip on the bottom and both sides of the whole piece
  • adhere it to a darker piece of cs in this case rose red.
  • Stamp your main image on whisper white cs 2 1/4" square
  • Back it with sage shadow cs 2 1/2" square, then black cs 2 3/4" square
  • Pull the tab straight up and surprise, the message is revealed.
  • I used a stamp a ma jig to center the sentiment just right.
I am working on doing a tutorial for this card so stay tuned. And thanks for stopping by At Paula's Place.

Supplies: Pull Card
Stamp Set: One of a Kind 113624
Paper: Whisper white cs 100730, Sage Shadow cs 101563, Rose Red cs 102544,
Basic black cs
102851
Tools: Paper Cutter 104152, Stamp-A-Ma-Jig 101049, Tag Corner punch 107215,
aqua painter 103954
Ink: Basic Black Classic Stampin' Pad 101179,Yoyo Yellow Stampin' Write Marker 100050
Embellishments: Sticky Strip 104294

Tuesday, July 21, 2009

Party Hardy at the card making party

Last Friday night I hosted a card making party at our church building and all of us had a very good time. There were about 20 women who took part and some of them had never stamped before and were very surprised that it was what it was. I am not sure what they expected but they all took part in the festivities where we used the Big Shot to make one of the cards which you can see here. And then we made these other two cards. Merci and Wonderful Friend.
This uses a sale-a-bration set from 2008, Merci, which I just love hehe. And some supplies that have been hiding in my stamping studio. Like Positively Pink yikes. Now that's old but it was perfect for this card and for the situation because it wasn't actually a Stampin' Up event. There were four of us that just wanted to share our craft with other ladies in our congregation. It was tons of fun and the time went so fast.


With this card I did get to show off the Big Shot with the use of the little leaves sizzlit die. They were rightfully impressed and the prep time for this project was short. I used Itty Bitty backgrounds on whisper white cs in brillant blue and Wonderful Favorites for the sentiment also in brillant blue ink. These cards both go together very quickly and of course can be tailored to just want you need a card for and who.

Thanks for stopping by At Paula's Place.


Supplies: Merci card
Stamp Set: Merci (retired)
Paper: Positively pink cs, Whisper white cs 100730, Old Olive cs 100702,
Apricot Appeal 105124
Tools: Bone Folder 102300, Paper Cutter 104152,
Corner rounder punch 109047, aqua painter 103954
Ink: Basic Black Classic Stampin' Pad 101179, Old Olive Classic 102277, Apricot Appeal 105218, more mustard Stampin' write marker 100076, Yoyo Yellow Stampin' Write Marker 100050
Embellishments: Snail Adhesive 104332

Supplies: Wonderful Friend Card
Stamp Set: Wonderful Favorites 115114, Itty Bitty Backgrounds 114996
Paper: Whisper white cs 100730, Yoyo Yellow cs 102824,
Brilliant Blue cs 100721
Tools: Bone Folder 102300, Paper Cutter 104152,
Corner rounder punch 109047, aqua painter 103954, Big Shot 113439,
Little Leaves Sizzlits Die
114511,
Ink: Brilliant Blue Classic Stampin' Pad 100691


Friday, July 17, 2009

One cupcake at a time


Here is a stamp set that is very versatile. It is called The More The Merrier. It's a hostess set but you can qualify to receive this set with a $250. show. So get your friends together and place an order and you will have this set coming to your house in no time. The cupcakes are just one of four groups featured on the stamps.

  • I have a standard side fold card 8 1/2" x 4 1/4' folded in half.
  • I stamped the cupcakes on whisper white cs 1" x 4 1/4" with basic black
  • I paper pieced the cupcakes with rose red and tempting turquoise cs, you do that by stamping on colored cs in black and cutting each piece out carefully and gluing them on where they fit. Sort of like a puzzle but you are making the pieces. Even the little cherry is pieced.
  • I colored the rest of the cupcakes with markers. Yoyo yellow, pretty in pink, close to cocoa (for the chocolate), and gable green for the leaves.
  • Back the white piece with rose red 1 1/2" x 4 1/4".
  • Punched another scrap piece of rose red with the scallop square punch.
  • Stamped the sentiment on white cs and punched it out with the modern label punch
  • Cut out a 1" square of tempting turquoise
  • Assembled those three pieces together and put them on with dimensionals.
That's it, CAS. Any questions email me and thanks for stopping by At Paula's Place.

Supplies:
Stamp Set: The More the Merrier 115322
Paper: Rose Red Card Stock 102544, Whisper White 100730, Tempting Turquoise 102067
Tools: Bone Folder 102300, Paper Cutter 104152, Scallop Square Punch 112081, Paper Snips 103579, 2-Way Glue Pen 100425
Ink: Tempting Turquoise Classic Stampin' Pad 100814, Basic Black Classic Stampin' Pad 101179,
Close To Cocoa Stampin' Write Marker 100072, Green Galore Stampin' Write Marker 100048, Pretty In Pink Stampin' Write Marker 100045, Yoyo Yellow Stampin' Write Marker 100050

Thursday, July 16, 2009

Birthday Wishes

Here is another card using the Wednesday sketch 231 from SCS. A good example for doing 2 cards with the same layout but getting drastically different results. See this post for another example of this layout.

  • I used creamy caramel cs for the card base, side fold 4 1/4" x 5 1/2"
  • Stamped that with choc. chip and the pretty petals bg stamp. For stamping with a background stamp lay it flat on your table, rubber side up, and ink it up with a brayer and your ink pad. Then lay the cs you want stamped on top of the rubber and using a piece of scrap paper on top of that gently rub it all over. Take away the paper and lift the cs up and you should have a really good imprint on your cs.
  • Also a piece of textured old olive 2 1/4" x 4 3/4" was stamped with pretty petals and old olive ink, then cut in thirds, ending up with 3- 3/4" x 4 3/4" strips
  • I backed each strip with 1" x 5" strip of choc. chip cs.
  • Adhered them to the front of the card over the bg evenly spaced.
  • Then I took a piece of very vanilla cs 1 3/4" square and stamped the leaves from Pocket Silhouettes on it in old olive along with birthday wishes in choc. chip ink from Wow Flowers.
  • Backed that with a 2" square of choc. chip cs and using dimensionals adhered that to the card.
Again a cas card that is very quick and is appropriate for a man or a woman. I hope you like it and thanks for stopping by At Paula's Place.


Supplies:
Stamp Set: Pretty Petals 111008, Pocket Silhouettes 111672, Wow Flowers 111714
Paper: Creamy Caramel 102514, Chocolate Chip 102128, Very Vanilla 101650, Earth Elements 12X12 Textured Card Stock 108697
Tools: Bone Folder 102300, Paper Cutter 104152
Ink: Chocolate Chip Classic 100908, Old Olive Classic 102277
Embellishments: Stampin' Dimensionals 104430

Okay, now you have stuck through to the end, read everything about this card and now if you are the first person to leave me a comment by July 17 @ 5 pm I will send you this card.

Wednesday, July 15, 2009

Coral Flower

Here is a SCS sketch challenge that I did a while ago. It's SC231 so here is the challenge and everything you need to do a sketch.

  • This is done with a Cameo Coral Card 8 1/2" x 5 1/2" folded in half
  • Then I took a piece of Walk In The Park dsp 2 1/4" x 4 3/4" and cut in thirds so you end up with 3- 3/4" strips.
  • I backed those strips with the basic grey cs; each piece measures 1" x 5".
  • Adhere them to the card front
  • Add the flower from the pretties kit which is colored with Cameo Coral ink and a dauber. Then add the half pearl. Finished

Card sketches are great for inspiration and they push a stamper to do things they wouldn't normally do. I do not use dsp very ofter but when I see a card that uses it I love them. So I need to do that more often. I hope you like this card.

Thanks for stopping by At Paula's Place.


Supplies:
Stamp Set: none
Paper: Cameo Coral 100475, Neutrals Card Stock 108588, Walk In The Park dsp (retired)
Tools: Bone Folder 102300
Ink: none
Embellishments: Pretties Kit 109114

Tuesday, July 14, 2009

It's Good To Dream of a "Little" Blog Candy

How about a little Razzle Dazzle today. Don't you love this stamp? It just looks like a fantasy and the perfect sentiment to go along with it is "It's good to dream" That's what I'm doing every time I stamp something, dreaming about how someone will enjoy receiving a hand made card for some special occasion or for no reason at all. Would you like to receive this card in the mail? Hint Hint keep reading Or better yet make this card for someone special in your life. Here is all you need to do:

  • I inked up the razzle dazzle large flower stamp with green galore ink.
  • I used a blender pen to "erase" the areas I wanted a different color.
  • I then got my markers in rose red, lovely lilac and regal rose and colored the stamp where appropriate, then stamped it on the 2 1/2" square white cs.
  • The corner rounder was used on two corners opposite each other.
  • I layered this on top of rose red 2 3/4" square. The corner rounder was used again at the same corners
  • I took the 7/8" x 5 1/2" white piece and stamped three times, using the stamp-a-ma-jig for alignment, the small flower where I followed the same procedure.
  • I backed that with a piece of lovely lilac 5 1/2" x 1 1/8"
  • Then taking a piece of lovely lilac 2 3/4" x 1" and using the eyelet border punch on it I attached it to the rose red piece.
  • I punched a 1" circle out of the lovely lilac
  • I stamped on scrap whisper white cs in rose red It's good to dream from the same set.
  • Punched that out with the modern label punch. Then sponged the edges lightly with rose red.
  • I put the card together on a 5 1/2" x 8 1/2" green galore piece, folded in half. The large flower is adhered with dimensionals.
This is a fun card to make and it would be a fun card to receive. So here's the thing. If you leave a comment on my blog on this card by July 16 at 5 pm I will draw for a winner and send the winner this card. Probably have a pretty good chance.

Thanks for stopping by At Paula's Place.

Order 24/7 Remember the Deal of the Week

Supplies:
Stamp Set
:
Razzle Dazzle 116714
Card Stock:
Whisper White Card Stock 100730, Green Galore Card Stock 101768, Lovely Lilac Card Stock 100427, Rose Red Card Stock 102544
Tools: Bone Folder 102300, 1 Inch Circle Punch 109046, Eyelet Border Punch 113692, Modern Label Punch 116630, Stamping Sponges 101610, Stamp-A-Ma-Jig 101049, 3/16 Inch Corner Rounder Punch 109047, Stampin' Dimensionals 104430
Ink: Green Galore Classic Stampin' Pad 102122, Lovely Lilac Stampin' Write Marker 100056, Regal Rose Stampin' Write Marker 105108, Rose Red Stampin' Write Marker 100063

Monday, July 13, 2009

Boho Background Tiles


This is a great card if you need a quick one for a man. Punching out the squares with the square punch makes fast work of this project. The black and vanilla colors keep it very simply male. They don't like a lot of embellishments and that's okay because in the stamping world there is something for everyone. The clean lines really give this card a sharp look and remind me of an old fashioned tile floor but I also have a hand crafted bag that uses this same color scheme and I use it to carry all sorts of items when I need to tote them around. My inspiration came from here. Mary is a precision stamper who I have enjoyed following on her blog for a while now.

  • The first thing I did was stamp the circle from the Boho bg set on a piece of 2" x 2" vanilla cs in basic black
  • Then I backed that with a square of basic gray 2 1/8" and then backed that with a 2 1/2" square in black
  • The main card measures 8 1/2" x 5 1/2" folded in half which is black.
  • Next I punched out 12, 1 1/4" squares using the square punch. Six vanilla and six black.
  • I added a small filigree brad to one of the gray squares and adhered that to the bottom left hand corner of the card Spaced the rest of them across the card and adhered them with snail adhesive.
  • On the inside I attached a piece of vanilla cs measuring 4" x 5 1/4" because it is really hard to write on black cs.
It's just that simple. Thanks for stopping by At Paula's Place.


Supplies:
Stamp Set
:
Boho Backgrounds 114940
Card Stock:
Basic Black Card Stock 102851, Very Vanilla Card Stock 101650, Neutrals Card Stock 108588
Tools
:
Bone Folder 102300, 1-1/4 Inch Square Punch 104400
Ink
:
Basic Black Classic Stampin' Pad 101179
Embellishments: Filigree Designer Brads 112577